You will be pleasantly surprised to find that you can change your
car's disc brake pads quickly, easily and without specialized tools.
Doing it yourself also will save you a lot of money. But even if you're
not interesting in doing this yourself, knowing what's involved makes
it easier to understand what your mechanic may someday tell you.
Nearly all cars these days have front disc brakes. Front brakes
usually wear out more quickly than the rear brakes (which could either
be
disc or drum brakes),
so they need to be changed more often. You need to change brake pads
when they get too thin, especially if they begin to make a persistent
metallic squeaking or grinding noise when you press the brake pedal. But
noise alone isn't always the best indicator, so it's best to anticipate
when this will happen by periodically inspecting the thickness of the
brake pads.
Note: If the front end of the car vibrates when you apply the brakes,
your brake rotors may be warped. If the rotors appear grooved or
uneven, they may be scored. In either case the rotors may also need to
be replaced or "turned" on a brake lathe, a procedure not covered here.
You may need a professional's help for this, but you can see what's
involved in a rotor change by looking
here.
Money saved: About $250 for most cars and much more for luxury or performance cars
Time Required: 1 hour
Tools Required
- Disposable mechanic's gloves to protect your hands and keep them clean
- Jack and jack stands
- Lug wrench
- C-clamp or length of wood to retract the piston
- Wrench (choose a socket, open end or adjustable wrench)
- Turkey baster for drawing out brake fluid
- Plastic tie, bungee cord or piece of string
Materials Required
- New brake pads. Since you are saving
money by doing this yourself, you might want to consider splurging a bit
by buying original manufacturer brake pads, which are more expensive.
- Can of brake fluid — check your owner's manual for the proper type.
Here are a couple of things to note before you begin.
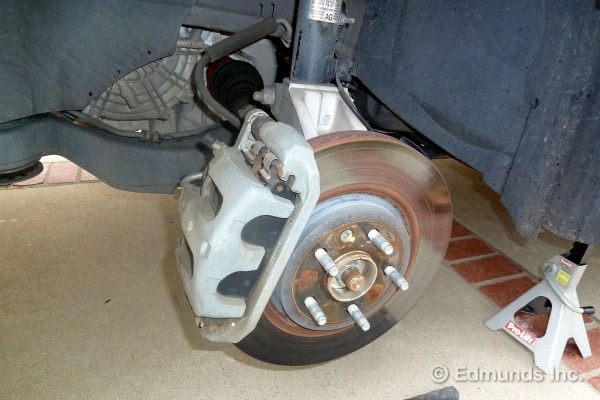 Know your calipers:
 The majority of cars have a
"sliding caliper" brake assembly. That's what's shown in the photo
above. Compare this brake assembly to the one in your car. Other cars
have "fixed caliper" assemblies. The pads in fixed-caliper brakes are
also easy to change but the process is slightly different, so we'll
cover it in another instructional piece.
Do one side, then the other: For reasons that will
be clear later, you should change the pads on one side of the car from
start to finish before doing the other side. Also, since you're doing
one side at a time, turn the steering wheel so that the wheel you're
working on is angled out for better access to the brakes.
Now we can get started.
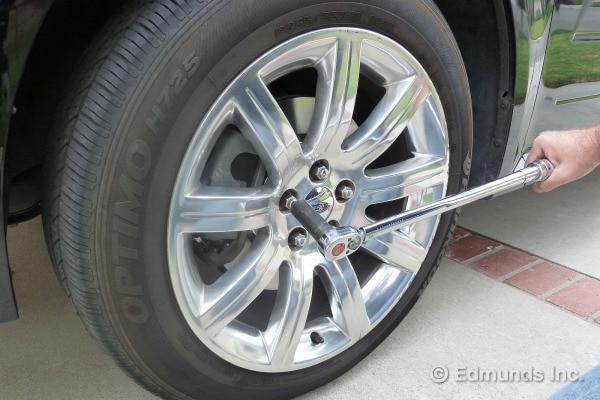
1. Loosen the lug nuts on the wheel. Then jack up the car and place a
jack stand under the car's frame. Lower the jack so its weight rests on
the jack stand. Fully remove the lug nuts and remove the wheel. You now
have access to the brake assembly and can safely reach under the car.
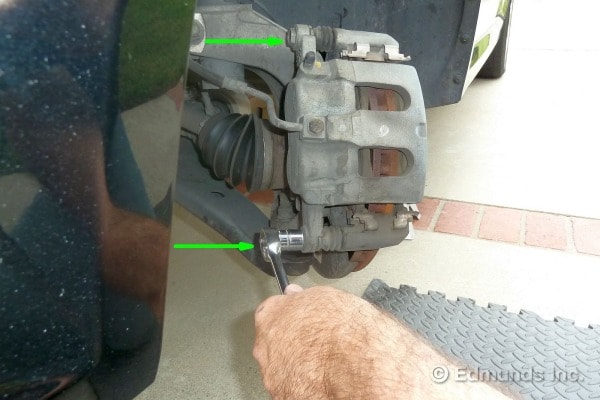
2. Find the two slider bolts (sometimes called "pins") that hold the caliper in place. On this car, a
2009 Ford Flex,
the bolts are on the inside. The arrows in the photograph above point
them out. It's generally only necessary to remove the lower bolt. It can
be long but once it is fully loosened, it will slide out easily.
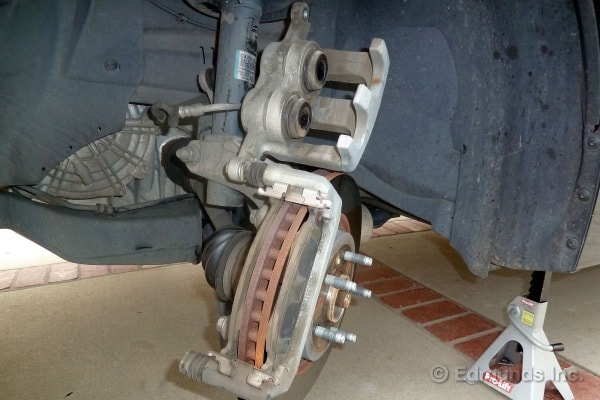
3. With the bottom bolt removed, the caliper pivots up, as shown in
the photograph above. The rubber hose, which is the hydraulic line, will
flex to allow this so do not disconnect any hydraulic lines. If you
think you have to disconnect a hydraulic line, you're doing something
wrong. Reassemble the brakes and seek professional help.
At this point, it is very easy to inspect the thickness of the brake
pads to confirm that they need to be changed. Most brake pads have metal
wear indicators, which are small metal tabs that squeak when they
contact the rotors. Even if these are not yet touching, the pads are
worn out if the friction material is 1/8th of an inch thick or less at
any point.
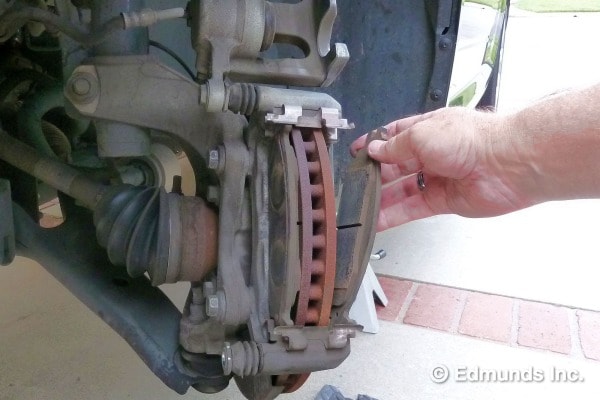
4. The brake pads are now exposed and the retaining clips hold them
loosely in place. Simply slide the old brake pads out, as shown in the
photo.
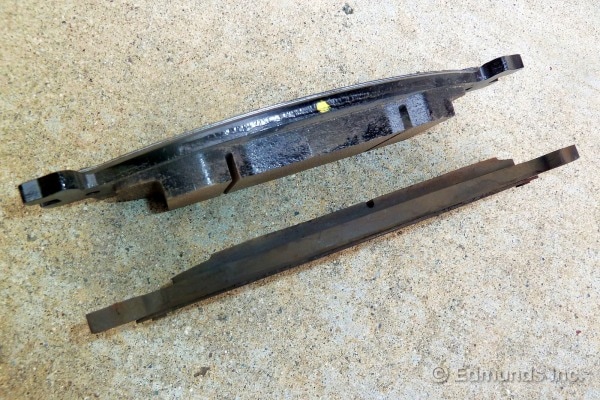
In the above photo, you can see a comparison of the new, thicker brake pad (top), next to the old, worn-down brake pad (bottom).
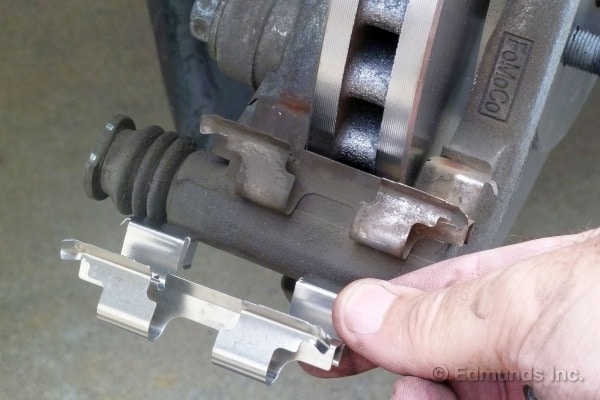
5. The photo above shows the pad's new retaining clips. New pads
almost always come with new clips, which allow the pads to slide back
and forth easily. Use the new ones and chuck the old ones. There are no
retaining screws for the clips. They just snap in place. There are
usually left-handed and right-handed clips, so change one at a time,
making sure they match up exactly as you go.
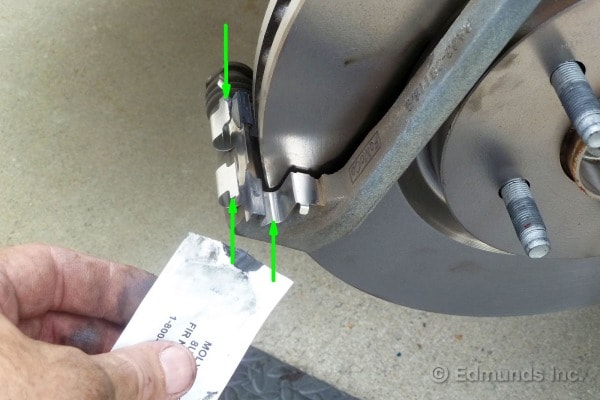
Often, a small packet of graphite-based grease will come with the
brake pads. Apply this to the clips of the new brake pads to keep them
from squeaking, as shown in the photo above.
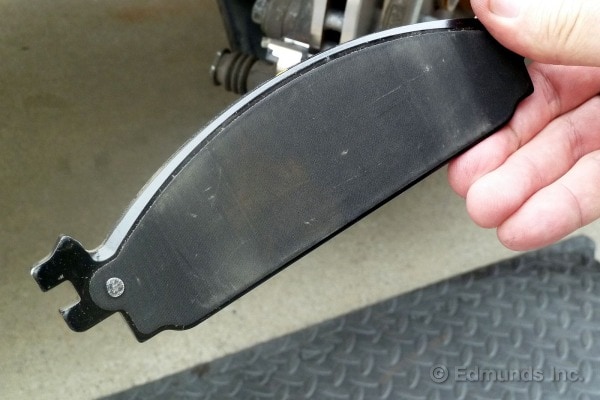
This photo shows that the new brake pad has a riveted-on shim, which
is the thin metal plate. Some brake pads might have unattached shims
that have to be temporarily held in position until you lock the pads in
place. The "ears" are the metal tabs on either end of the brake pad
(only the two left ears are visible here). These ears fit into the slots
in the clips. Some of the grease can be applied to the ears and between
any loose metal shims, too.
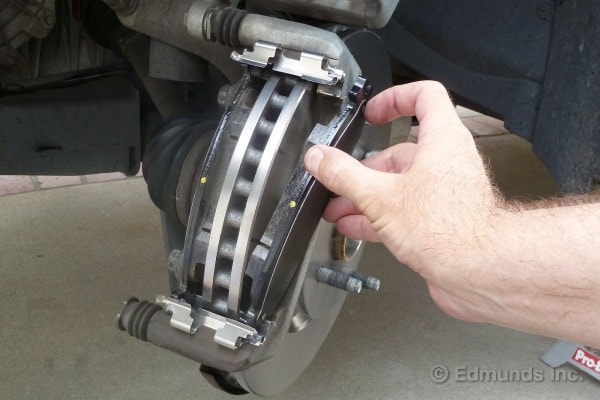
6. The new pads slide into place as easily as the old ones did when
they came out, though sometimes the new clips will be tighter. The ears
of the new pads should slot nicely into place on the grease you applied.
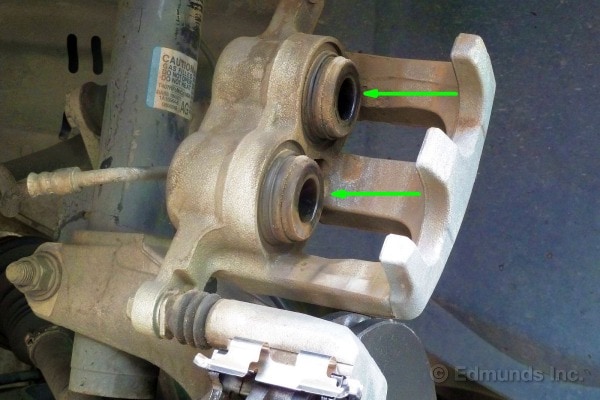
7. In the photo above, the arrows point to the pistons. These pistons
press on the brake pads and squeeze the rotor to stop the car. Your car
might only have one piston for each wheel, but the principle is the
same. Before you can lower the caliper into place, these pistons need to
be retracted (pushed back) so that they will clear the new, thicker
brake pads.
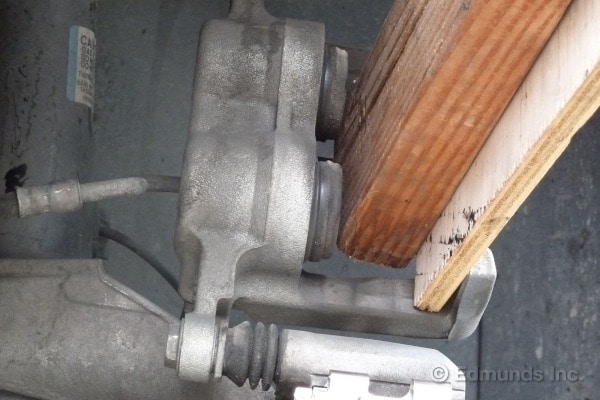
8. Do-it-yourselfers often use a C-clamp to retract the piston or
pistons. In this case, we simply levered the piston back using a 2x4 and
a piece of plywood. By doing this, the brake fluid in the pistons is
being pushed back into the master cylinder reservoir through tiny
passages, so the pistons move slowly. The width of the 2x4 allows both
pistons to be pushed in at once. If you pushed in one by itself, the
other would pop out — you don't want that. Fortunately, most cars have
just one piston per caliper, which makes things far simpler. Either way,
steady pressure and patience are key here. In this example, we added a
second plywood shim near the end of the process to fill the
ever-increasing gap. Throughout, take the utmost care to ensure you
don't nick or tear the rubber boot and seal that encircles the pistons.
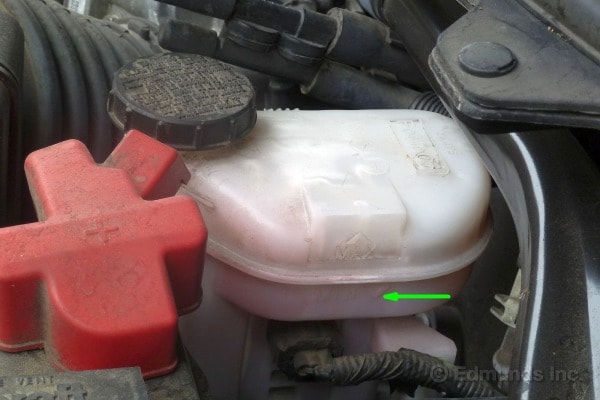
9. When you push the pistons back, the brake fluid level slowly
rises. Open the master cylinder reservoir and check it often. This is
more of a concern when you work on the second brake, because the
combined fluid volume of two calipers could cause the brake fluid to
overflow. If it looks like this is going to happen, suck out some of the
brake fluid with a turkey baster. There is more danger of overflowing
if someone topped off the fluid level during regular service visits.
(This is why the brake fluid reservoir shouldn't necessarily be topped
off like that.) The fluid level naturally goes down as the pads wear.
And it comes back up when the pads are replaced. As long as the level
doesn't go below "MIN," the arrow shown in the photo above, on the lower
half of the reservoir, everything is cool.
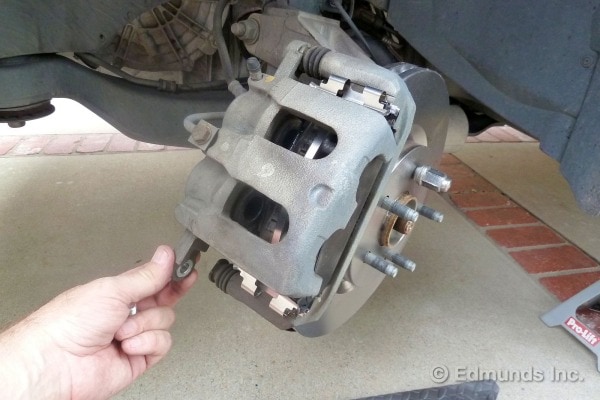
10. With the pistons retracted, the caliper should slip over the pads
with little effort. Sometimes the fit is tight and the caliper will
slide on the newly installed brake pads. If the pistons catch on the
brake pads, you might need to check that you retracted the piston
completely.
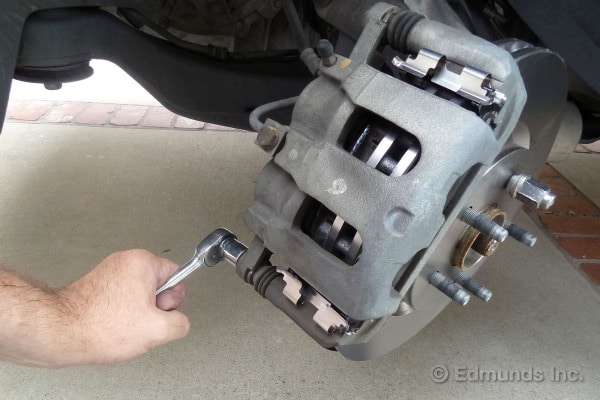
11. Reinstall and retighten the slider bolt. Straighten the car's wheels, re-mount the tire and tighten the lug nuts.
12. Repeat all these steps for the other side of the front brakes.
Remember that the brake fluid will be higher in the reservoir now that
new pads are installed on one side, so keep your eye on the fluid level
as you retract the piston on the other side. The fluid will only rise
further the second time around. You don't want it to overflow since the
brake fluid is highly corrosive. If it looks as if the fluid will
overflow, suck some out with the turkey baster. If the level is below
the "MAX" when both sides are done, add fresh fluid to top things off to
the line.
13. Test-drive the car under safe conditions to make sure everything
is working properly, being especially careful for the first few stops.
Be aware that your brake pedal might have a higher engagement point. You
will quickly get used to this change. Enjoy using your new brakes
knowing there are now thick brake pads to stop you safely.


